You might require flashing Stock ROM/ Firmware under different conditions if you have an Android Device. You have to flash Stock ROM/Firmware to bring your device back to its original state if you have flashed customized ROM or Kernel and if you are encountering several problems. Personalized or Custom ROMs have issues and bugs that your device is not set to deal with efficiently. On the other hand, Stock ROMs are the ones which come by default in Android phones or tablets developed by manufacturers, so all the glitches, and bugs, are debugged.
Android system files are vulnerable when you have root access. Rooting your device gives you more control over the phone because of which the chances of you messing the phone up increase. Still, it’s also easy to fix these problems by installing Stock ROM, and therefore in this tutorial, we will explain How to Flash Stock Rom using SP Flash Tool.
What is the SP Flash Tool?
Sp Flash Tool also known as SmartPhone Flash Tool, is simple Application and it works on operating systems like Linux and Windows. It allows you to flash a custom recovery and install any firmware/stock ROM to your Mediatek Android phones. The process of flashing custom recovery is similar to installing any stock ROM or firmware (flash stock ROM). It is used to un-brick the hard bricked android devices. Hard Bricking is the state of your android device where your phone does not switch on, or your phone goes into a boot loop.
These type of errors occur when there is a corruption file in you android system (Usually happens when you apply the wrong method of rooting or install a custom ROM or even when you mess up your system files out of your curiosity). If your phone is hard bricked or if you want to install some other firmware on your android phone then this tool is the only solution available if your phone is a MediaTek chipset. Flash Tool has a lot of features, some of which are mentioned below. If you want to know the detail features of the SP Flash Tool, you can read this article.
Features of SP Flash Tool
- Easily Flash Stock Firmware/Stock ROM.
- Fast, Simple and Easy to use.
- Don’t Need Any Extra Hardware.
- Upgrade Stock Recovery To Custom Recovery Easily.
- It supports both the Operating System (Linux and Windows)
- Very Low Resource Uses.
What is Scatter File txt?
A Scatter File is a.txt data which is made to define tons of areas in an android device which is operating on a MediaTek’s ARM architecture. Usually, such scatter files are required at the time of flashing stock ROM, making use of Application like the SmartPhone Flash Tool. We can quickly unbrick any Mediatek based Android devices by flashing the stock Firmware in most of the situations.
Pre-requisites:
- You need either Laptop or PC
- Create a backup of all data of your device before following the flashing method.
- Check the battery percentage of your device; it should be 60 to 70%.
- Disable any anti-virus application you have installed on your computer system.
- Prefer using Original USB Cable
- SP Flash Tool – Download (sp flash tool v5.1516)
- Ensure that you have installed necessary USB VCOM drivers for your particular device. If you have not installed, you can download it from here – Download
Warning: We are not responsible for any damage or problem occurred to your device while following this tutorial. Do it on your own risk.
Steps to Flash Stock Rom using SP Flash Tool
Using SP Flash Tool, you can flash any Android device (however make sure to examine if it is based on Mediatek IC). Flash any type of Stock ROM or Custom ROM over any Mediatek Android Devices. Additionally, do see to it that you have installed appropriate USB drivers effectively on your PC or computer before flashing any firmware file.
Step 1: Unzip the SmartPhone Flash Tool and also download and install SP Flash Tool software from the above pre-requisites section.
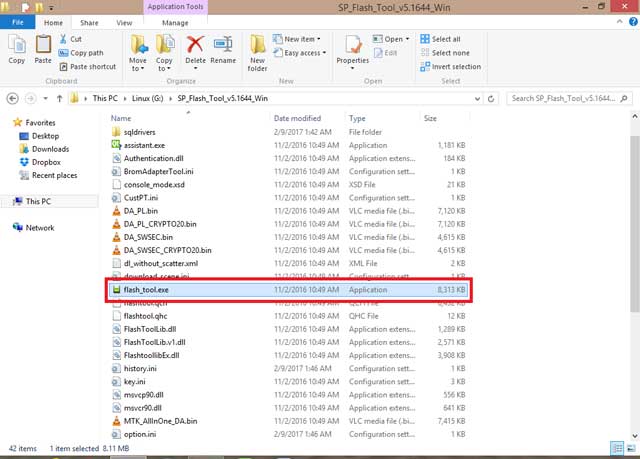
Step 2: Download flash recovery image: Flashing stock rom is not easy; it takes patience and time. To flash, make sure you have flash recovery image ready for your device model.
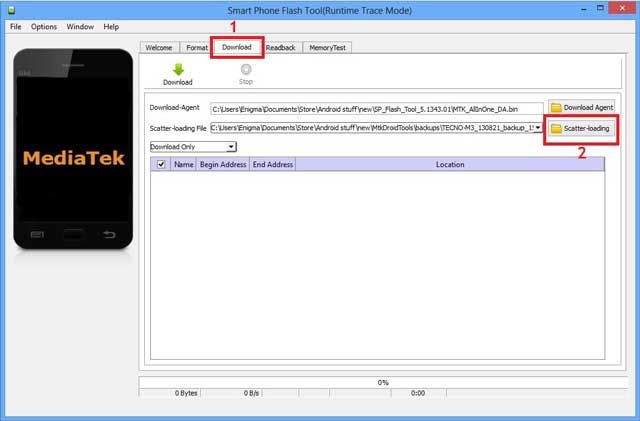
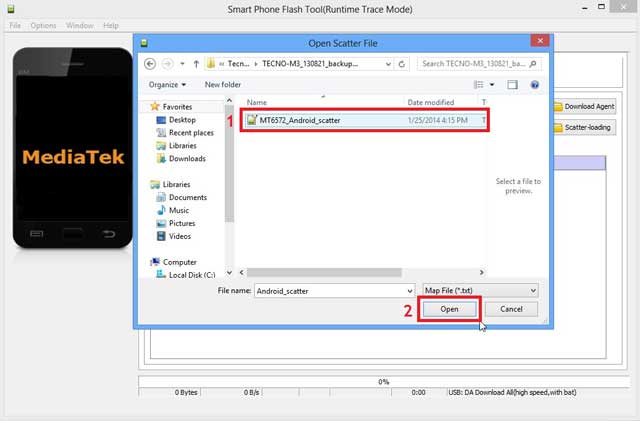
Step 3: Load scatter file: Now click on the “. exe” data to run the file. The software will ask you to fill the scatter file. Click Scatter Loading (Load Scatter file of your particular devices).
Step 4: Uncheck all packages: Now, you need to uncheck all boxes from the SP flash tool.
Step 5: Load Recovery Image: Go to and click Recovery box from the list and load recovery image of your particular MediaTek based android device
Step 6: Recovery box is checked before you connect your android device, in recovery image location (Uncheck all the remaining boxes).
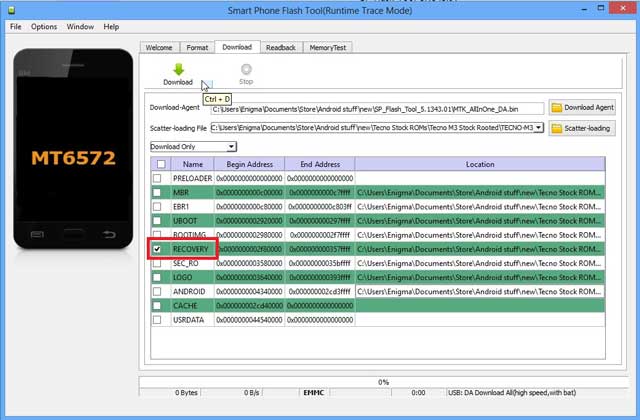
Step 7: After connecting your tool with Computer or Laptop, click download button ahead and click YES.
Step 8: Now to start the Flashing process, you should remove your phone’s battery (only if the battery is removable). Insert it again, Hold the Volume Down and Volume Up Button together and Connect your Phone to Computer or Laptop using USB Cable (Keep the Volume Down and Volume Up key until your computer detects the phone.)
Step 9: Once, you are practically done with the Flashing process; it will be triggered with a green circle.
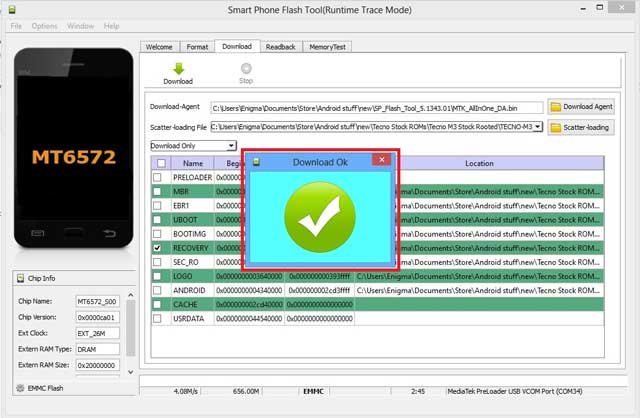
Step 10: That’s it! You have successfully flashed stock ROM in your device.
Note: Do not interrupt the flashing process. If you do so, your phone will go into the dead condition and its hardly possible to make it on. You might further get the “USB device not recognized” error on further flashing stock rom attempts. You can read this article to fix the common error that occurs while flashing process using SmartPhone Flash Tool.
Conclusion
That’s it. If you follow each and every step correctly, then you would be able to flash stock ROM using SP Flash Tool. We truly wish that you located this tutorial sensible. Just in case, if you have stuck somewhere in between the flashing process, feel free to reply in the comment section below.

